


A new alpha build is on the Download page, for Windows and for Linux (including the Steam Deck). The previous available build was from October 14th. I briefly posted another on October 24th, but took it down the same day because the settlement still needed more work. This build replaces it. Everything in the October 19th post is in this one too: the full set of 112 masteries, generated recruits with favours to ask, readable books, homesteads in the countryside and harvestable bushes.
There has been a lot of work since the 14th, particularly on the voyage, settlement management and combat balance.
The main quest goes to sea
This section describes the quest after the Galdorscōl in general terms.
Once you’ve finished The Scōl’s Price, the Archmaester grants the party passage on the school’s brig. Her captain is Tsovit vor Shāvard, a Hēahfolc sailor with his own portrait and dialogue. He waits on the landing beside the ship, and you speak to him when you’re ready to sail.
You follow the voyage on the world map as the ship sails its route and clears the fog ahead. Part way across, a fleet of three ships closes in and opens fire, and a shot wounds Tsovit at the helm, so you take the wheel. The battle comes in three waves of one ship each: two smaller ships, then a large one. Enemy ships ram, throw harpoons to hold you alongside, and send boarders over the rail. One kind of large ship carries a weaver whose bolts slow your gunners. You steer with the movement keys or the left stick and fire with a left click or RT. A short tutorial explains the controls before the first fight, and the crew patches the hull between waves.
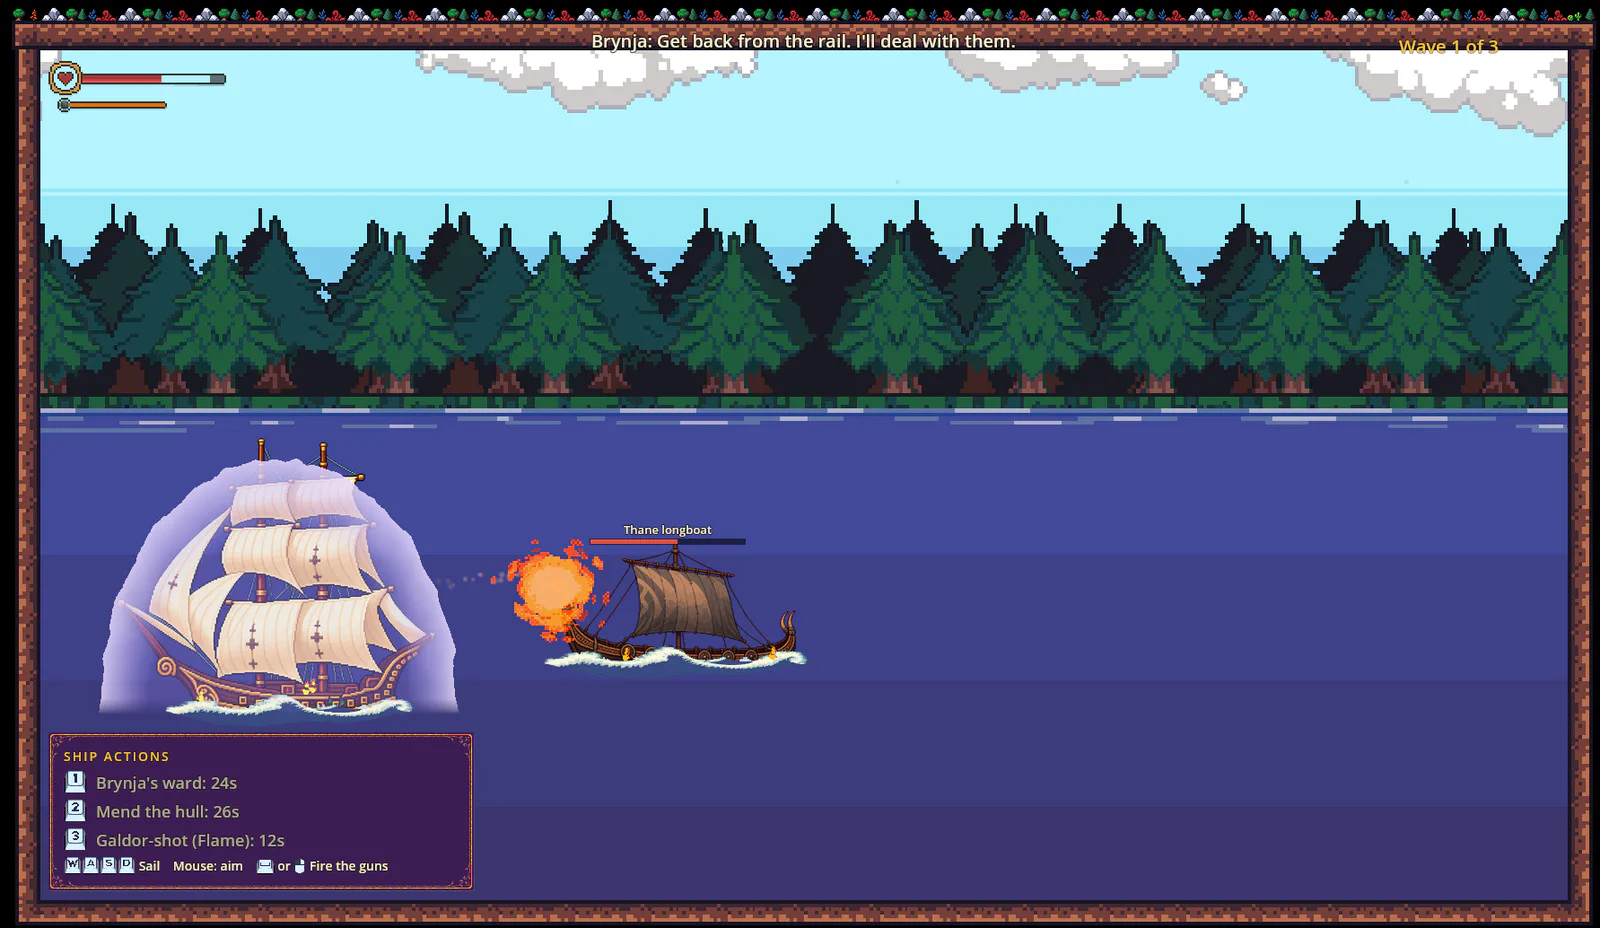
Your party helps from the deck. Their actions are shown in a panel and use the first three hot bar keys:
- A ward around the hull, if Brynja or a weaver recruit is aboard. It absorbs the next 30 damage.
- Mend or patch the hull for 20 points, every 30 seconds.
- A galdor-shot in your strongest school of magic, or Brynja’s if you don’t weave. A Flame shot sets the target burning, a Frost shot freezes its guns and helm, and a Storm shot chains to a second ship.
Companions comment as the fight goes on, and every generated recruit has lines of their own for the voyage. If your ship is sunk, you can try the fight again.
Even if you win, the brig is too badly damaged to finish the voyage. The brig heads for the nearest coast, where you and the crew come ashore far from any town.
A settlement to run
With the brig stranded, you need somewhere for the crew to live while you prepare to sail again. You build and manage that settlement on the beach.
Getting started
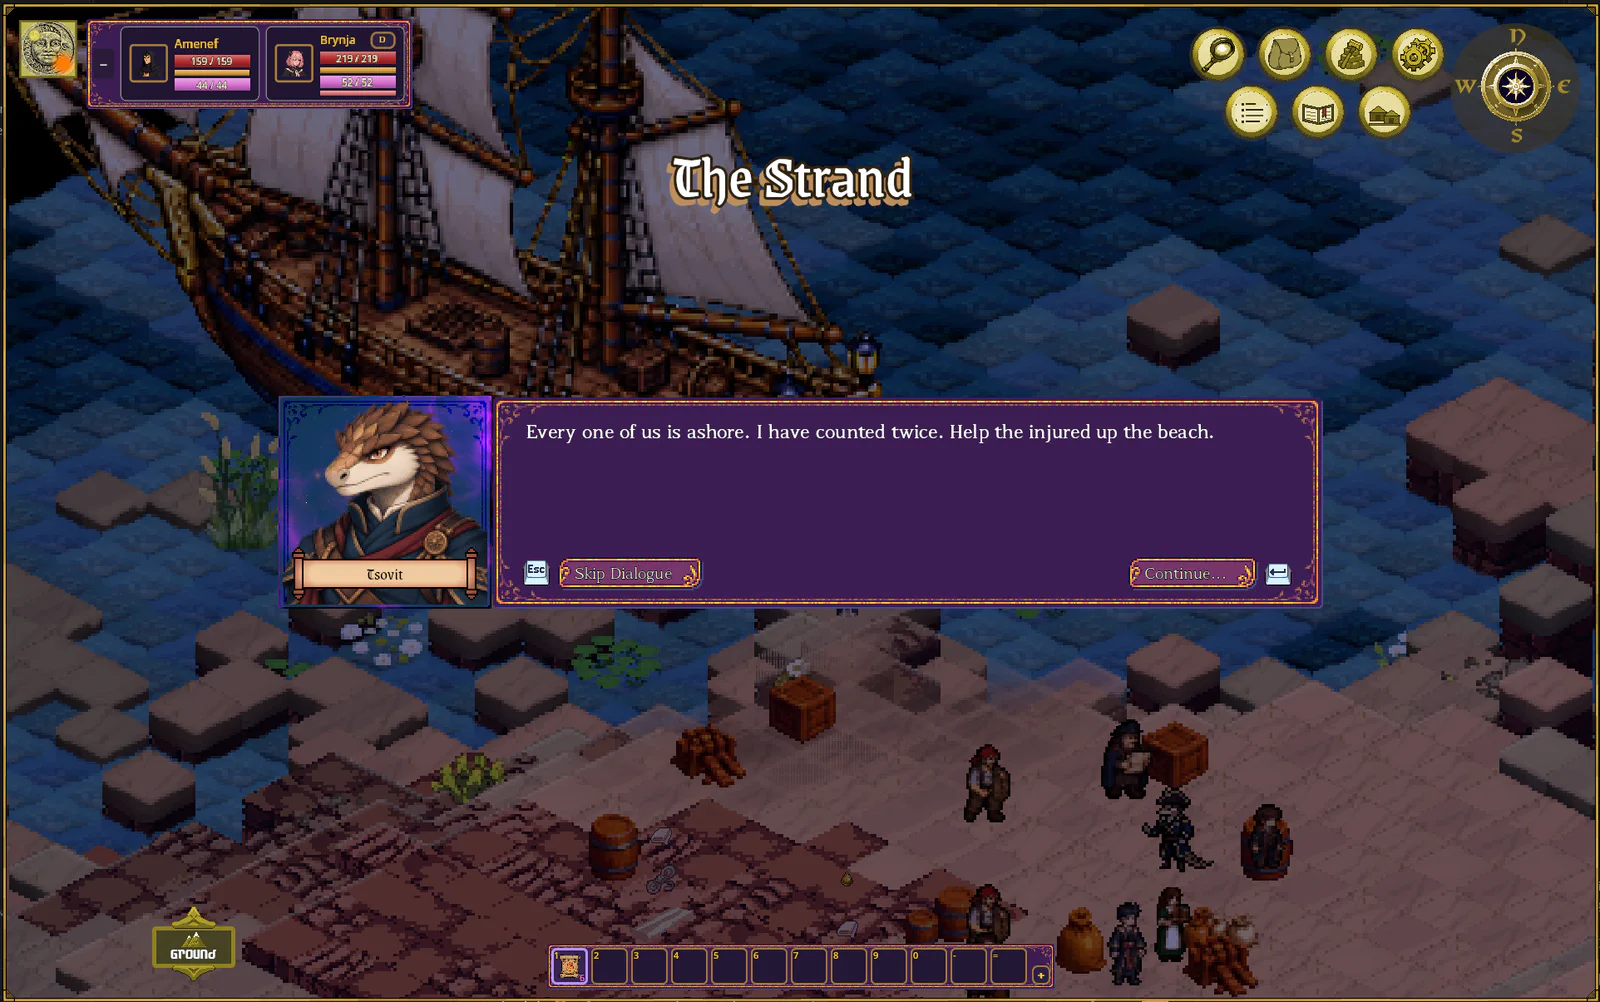
The first quest, The Strand, takes you through the basics:
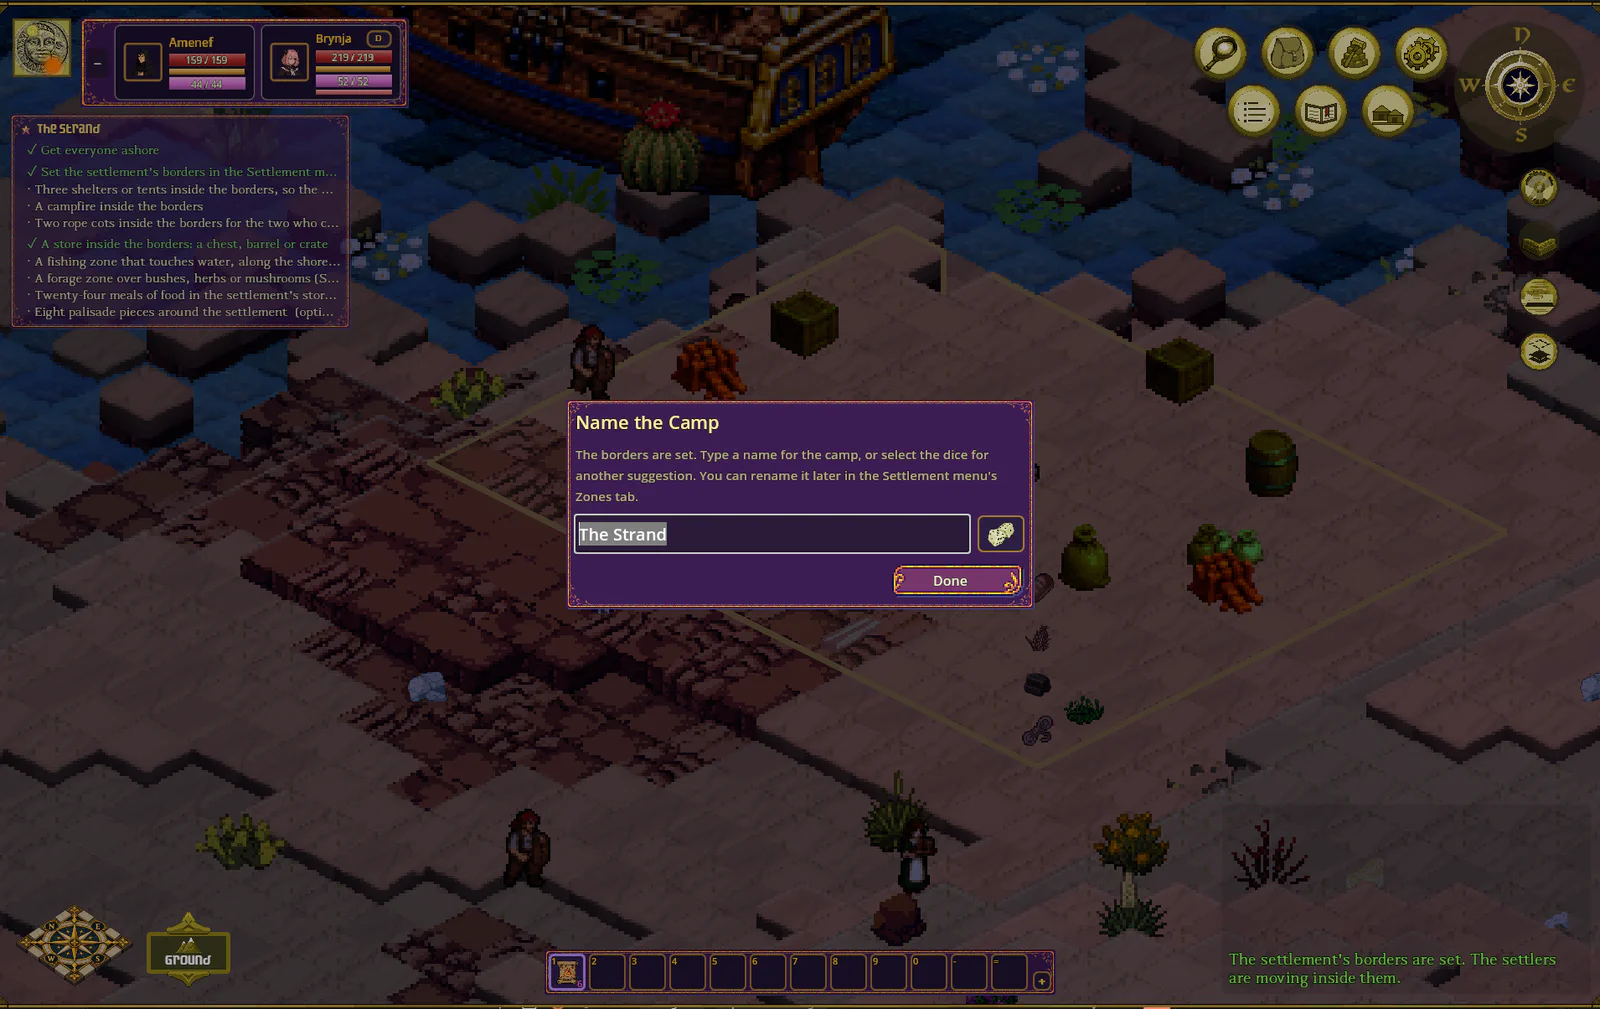
- Set the settlement’s borders in the new Settlement menu. You draw them on the map, and you can add to them or take parts away later. The first time you set them, you name the settlement.
- Build three shelters or tents, a campfire, two rope cots for the injured, and a chest, barrel or crate for storage.
- Mark a fishing zone along the water and a forage zone over bushes, herbs or mushrooms.
- Put 24 meals into storage and put up eight pieces of palisade.
You receive the building charter for these structures when you come ashore.
The Settlement menu
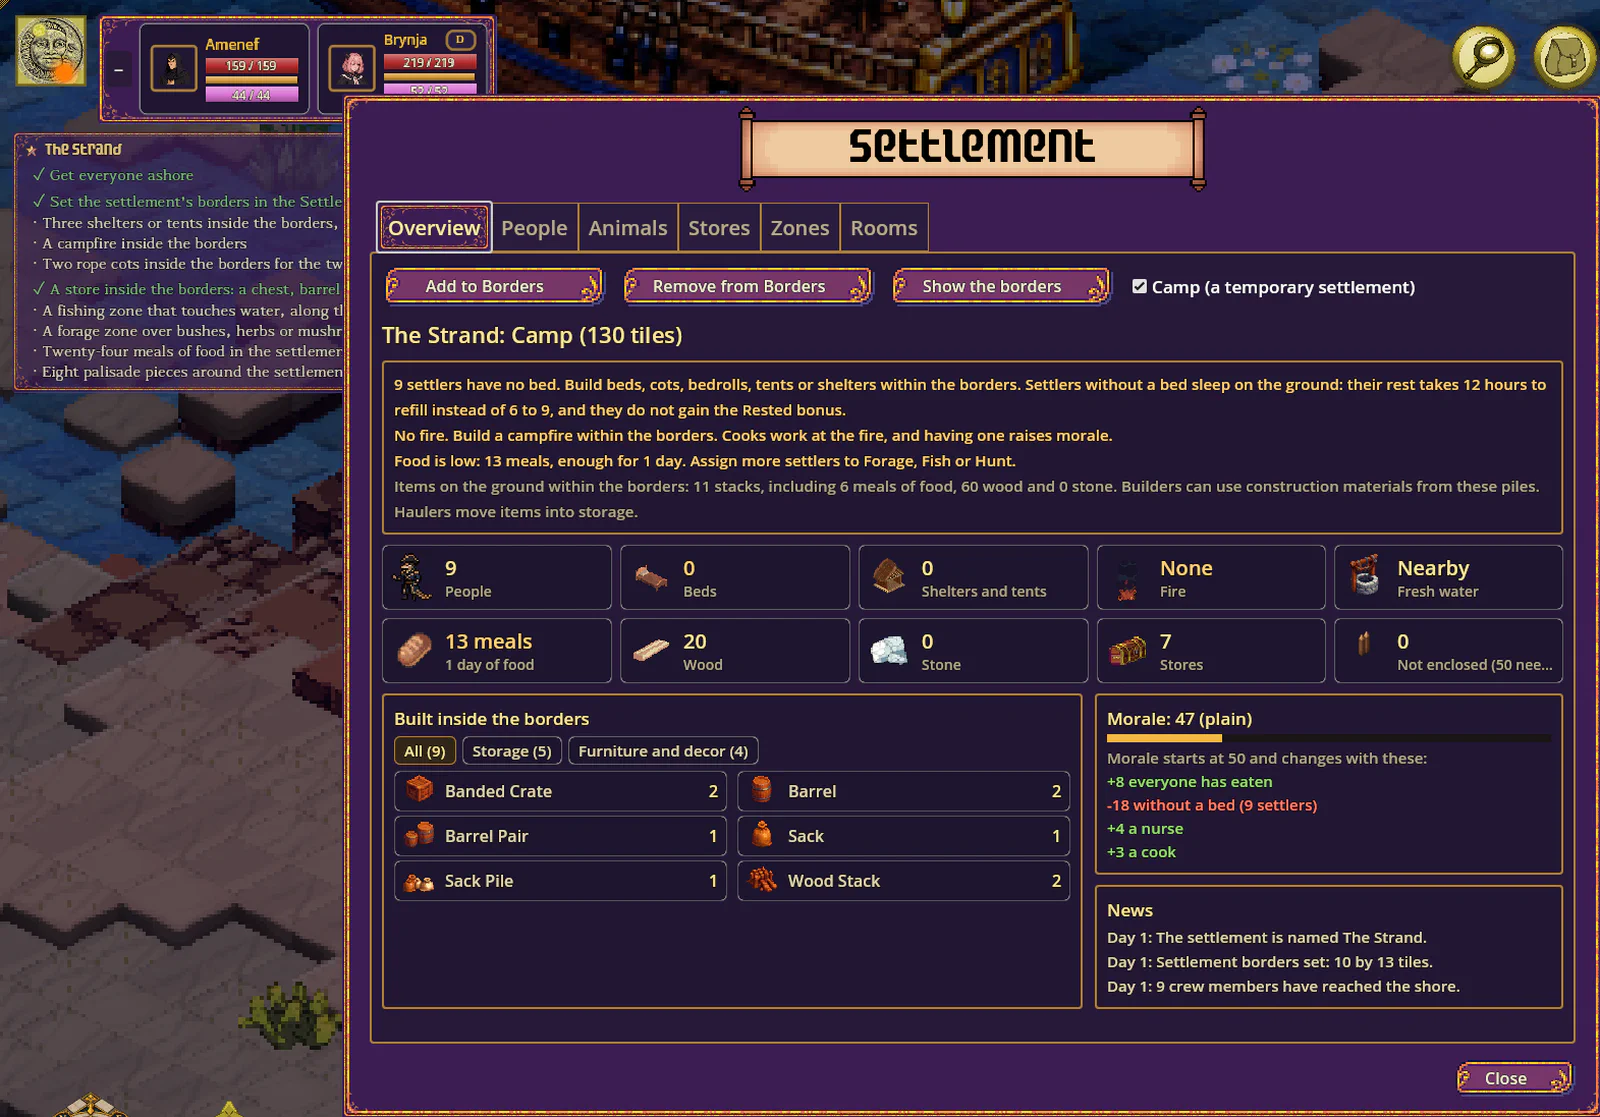
The menu has six tabs:
- Overview: what needs doing, the settlement’s morale and the reasons for it, and what has been built.
- People: each settler’s jobs, with a priority from 1 to 4 for each (or never), their needs, their gear, and a tickbox to make them a guard.
- Stores: everything in storage, with icons, filters, search and totals. Every container inside the borders is storage, and each one can be set to take only certain things.
- Zones: the areas where settlers work, which you can name, colour, resize and delete.
- Animals: the animals you keep, and a list of every kind of creature your hunters can hunt.
- Rooms: every space fully enclosed by walls and doors, which you can name and give a purpose.
Settlers and their work
Settlers do their work in person on the map. Woodcutters fell trees, fishers cast a line and wait for a bite, and builders work through each construction job, with a bar showing their progress. The jobs are foraging, fishing, hunting, looking after animals, farming, woodcutting, quarrying, building, hauling, nursing and cooking. The work carries on while you’re away.
- Zones. Most outdoor work happens in zones you mark out: forage, fishing, woodcutting, bush-cutting, growing, animal pens and dumping zones. Settlers only work inside them, so they won’t cut down a berry bush you want to keep.
- Farming. Growing zones can be planted with potatoes, carrots, corn, cauliflower or wheat. Farmers till, sow and harvest, and crops grow day by day, including while you’re away.
- Mining. Quarriers dig stone, and sometimes ore, out of a Mine Shaft.
- Hunting and taming. Point at a creature to mark it for hunting, or for taming if it’s peaceful. In the Animals tab you can select species for hunters to target automatically. Hunters use bows, slings or crossbows from storage if there are any.
- Animals. Tamed animals can be kept in pens. Cows, goats, sheep and others give milk, and chickens, ducks and geese give eggs. Two of a kind in a pen will breed.
- Gear. Settlers can be given weapons and armour from storage. Each one arrives with gear suited to their trade.
- Hauling. Haulers collect loose items and take them to storage. Items that no storage container accepts go to a dumping zone.
Needs, sleep and morale
- Settlers need food, water and rest. They drink from wells, troughs, rivers, streams and lakes. Hover over a settler to see how they’re doing.
- Settlers go to bed at night, and so do townsfolk in towns. The quality of their bed affects how rested they are the next morning. A proper bed is best.
- Morale rises when people are fed, have a bed, a fire, a nurse and a cook, and falls when they go hungry or have nothing to do. When morale is good and there’s food and a spare bed, newcomers turn up looking for a place to stay. If the stores run dry for three days, people leave.
- A badly hurt settler collapses and starts bleeding out rather than dying immediately. You and your companions can heal them, and bed rest heals their wounds.
Food and storage
- Food spoils, in your pack as well as in storage. Raw meat and fish last about three days, cooked food about ten. Dried food keeps for months and salted food for about a year. Bread, cheese, milk, eggs, fruit and vegetables don’t spoil.
- A drying rack and a butcher table turn raw meat and fish into food that keeps. Cooks choose recipes that make food last longer.
- Food in a Rune Icebox spoils at one-tenth the normal rate.
- Containers hold much more: a chest has 42 slots.
- Traders sell crafting materials in larger quantities.
Building and defence
- Fortifications. Palisades and a stone rampart, with gates, have their own tab in the Build menu. You place one kind of piece and it joins up with its neighbours by itself.
- Work stations. A butcher table, carpenter’s bench, loom, anvil, grindstone and drying rack are in the Build menu’s Crafting tab.
- Guards patrol the settlement and its borders. Use the guard checkbox in the People tab to assign a settler to guard duty. Tsovit guards by default. Guards fight with the weapons you give them and get better at it as they fight.
- Raids. On any day there’s a small chance of a raid. The raiding band gathers outside the borders before it attacks, and its size depends on your settlement and whether your party is there. Raiders can loot your stores or carry off incapacitated settlers. Killing a captor frees the settler they were carrying. Driving a raid off raises morale. If you’re away, the settlement fights without you.
- Visitors. Wildlife wanders onto the map, along with travellers and traders, and occasionally something more dangerous.
What comes next
The quests that follow ask you to grow the settlement to eight people with a bed each, forty meals in store, morale of 70 and a complete perimeter of fortifications, then to rebuild the brig with 120 wood and 10 rope. After that she can sail again, on to where the party was originally going. The main quest currently stops when you arrive there. The scene that follows is the next major piece of writing.
This is still an early version of the settlement. Raiders don’t damage buildings yet, and settlers carried off in a raid can’t be rescued yet. Both are planned. I’d like to hear how it plays.
A combat rebalance
I used a party from a test save to run thousands of simulated fights while tuning combat. Before the rebalance, a raid on the settlement was over almost as soon as it started: abilities and thraeds cleared most of a band in the first second or two.
- Creatures have more health, and they get tougher the deeper you go. Each step of loot depth adds 7% to their health and 6% to their damage.
- Area abilities (Whirlwind, Footwork, Fan of Knives, Groundbreaker, Crosscut, Driving Thrust, Storm of Steel and Piercing Shot) deal less to each enemy they hit. Abilities aimed at a single enemy keep their strength, and Thousand Cuts is stronger.
- Weapon abilities now calculate damage from a single hit with each eligible weapon you hold, a little more with fast weapons and a little less with slow ones.
- Your damaging thraeds deal 75% of what they did. Healing is unchanged.
- Two-handed weapons: Cleaving Stroke and Spear Wall give bigger bonuses with a two-handed weapon, and Ward of the Blade gives 35% more armour. Single Edge and Twin Edge are stronger too.
- Damage over time. The damage from poison, burning and bleeding now scales with the hit that applied them. For effects caused by your party, the total damage is based on a full hit (80% for bleeding), with the previous damage values as a minimum. They last half as long, so most of the damage lands before the fight is over. Poison stacks: the first application does full damage, and each extra one does 70% of the one before it. When the oldest application expires, the remaining stacks move up to the higher damage rates.
- Raids include archers and spellcasters. About a quarter of the melee raiders go after your ranged and spellcasting party members, and any settlers who aren’t guards. Raiders are tougher when your party outranks them, and a band keeps fighting until about two-thirds of it has fallen.
- Sixteen new enemy variants add ranged fighters and spellcasters to the raiding groups: hobgoblin crossbowmen and shamans, gnoll archers and shamans, orc archers, bugbear crossbowmen and shamans, Dracanfolc archers and shamans, lizardfolk shamans, halfling mages, slingers and rangers, and outlaw archers, pyromancers and cryomancers.
- Loot tiers rise more slowly with depth. The first dungeon gives tier 2 and 3 equipment, and now and then tier 4 from tougher enemies.
- Armour. Every tier above I adds a point of armour or dodge, alternating between the two. Before, small pieces such as gloves often had the same numbers as the tier below and only cost more.
- The danger rating shown when you meet a group on the road has been recalibrated.
The simulations helped me choose these values, but they still need playtesting. I’m keen to hear how fights feel.
Thraeds up to tier 5
Thraedweaving used to stop at tier 3, while the masteries go up to tier V. There are now 29 new thraeds across tiers 3 to 5, which brings the total to 71.
- Tier 4 thraeds become available at 28 ranks in Thraedweaving, and tier 5 at 36. A master of a school can teach you one tier beyond what your Thraedweaving rank normally allows.
- Every offensive school has a choice at each tier from 3 up, including area spells thrown at a target and ones centred on yourself. Flame and Storm each get a powerful single-target bolt at tier 4.
- Halthraed and Bastionthraed are the first healing and protective thraeds that affect the whole party within their radius.
- Books with tier 4 and tier 5 thraeds turn up on shelves deeper in dungeons.
- Kindlethraed is now tier I Flame’s area spell: a small burst at a target up to 5 tiles away that sets everything in it burning. Before, it was a single-target spell that Flamethraed did better.
- Veilthraed now hides you. You become Veiled for 12 seconds, and most enemies can’t see you while it lasts. Your first attack ends it and deals 2.5 times the damage. A few of the strongest enemies can see through it. The dodge bonus still lasts 30 seconds.
- Bombs have been brought into line with thraeds: four times the direct damage, and twice the damage from what they leave on the ground.
Thraeds now have dedicated slots in the Journal. Until now, the thraeds you could weave were the first ones on your hot bar, up to your number of slots. The Thraeds page in the Journal now has a row of slots for you, the same as a companion’s. Click a known thraed to put it in a slot, and click it again to take it out. The hot bar only accepts thraeds that are in a slot, and taking one out of its slot also removes it from the bar. A tickbox on the page, on by default, puts a newly slotted thraed onto the first empty hot bar slot for you. A thraed can’t be taken out of its slot while it’s cooling down, but the others can be changed freely.
All companion roles can now cast wards. Before, only a companion set to the Buffer role cast wards such as Wardthraed, so Brynja, who is Mixed by default, carried one and never used it. Companions in every role can now cast their equipped wards. Healers and Mixed weavers do it when nobody needs healing, and keep some skein in reserve for healing.
Masteries, continued
The October 20th update to the last post covered the redesigned mastery abilities. They’ve had more work since:
- Mastery cards say what they work with, in a line under the description, such as “Bows and crossbows only.” or “Physical weapons only: not wands.”
- Runed Edge and Skein-tempered now work with bows and crossbows as well as melee weapons. Executioner now applies to melee blows only, and companions’ melee swings now get it too.
- Every weapon ability is either a burst around you or aimed. Aimed abilities pause the game while you choose a direction or a target, so nothing fires at whatever happens to be under the pointer in the middle of a fight.
- Roll now covers 8 tiles, leaving fading afterimages behind you.
- Footwork is a 4-tile dash that strikes everything in its path and slips past clutter such as logs, boulders and furniture. Walls, fences and shut doors still stop it.
- Fan of Knives now launches six projectiles as well as dealing damage in an arc. Each projectile uses a randomly chosen knife from the game’s item list and continues beyond the initial attack until it hits something. Depending on the knife, it can cause bleeding, poison, marking or staggering.
- Lunging Strike carries you up to 8 tiles to the enemy you pick.
- Both weapons count when you’re dual-wielding. Whirlwind has a wider reach.
- Dashes climb and descend single height steps, as walking does.
- Six passives that only added flat numbers have been reworked so they change how a build plays: Second School, Runic Focus, Lingering Weave, Even Keel, Light Step and Sidestep. For example, Second School now lets thraeds from your second-best school use your best school’s rank. Existing saves get a refund for masteries affected by these changes.
- The Wanderer’s Trailblazer is now Hard March, a cleanse for the whole group. Many Hands and The Long Road have also been revised.
- Companions choose targets for aimed abilities. They aim Footwork and other line attacks where they’ll hit the most enemies, and use Roll to escape danger.
- Quick attack. Middle-click a hot bar slot to make it your quick attack, then press the middle mouse button (or tap R3 on a controller) to use it. Aimed abilities fire in the direction you’re aiming without opening the targeting pause.
Some creatures were hitting far too softly for their tier. A Snow Yeti, for example, could be taken apart by a fen reaver with a dirk. Creatures’ natural attacks now scale with their tier, and the worst cases (yetis, elementals, the Swamp Troll, the Corrupted Treant and the Orc Savage) have been retuned.
Food and cooking
- Cooking has been greatly expanded: 12 new ingredients and 51 new dishes in three tiers. Higher tiers need more Cooking skill and a hearth or stove.
- Cooking skill affects food quality. Better cooks make more nourishing dishes with stronger, longer-lasting bonuses. The quality is shown on the item card.
- Staples such as flour, bread, pastry and dairy are made at the hearth, and wheat is now a crop.
- Fishing catches vary by location. The sea, rivers and lakes each have their own fish, and the size of a catch varies.
- Provisions slots. The equipment panel has two new slots for food, in its top corners. When your nourishment drops below 25 outside a fight, you eat one item from each, with all their bonuses. You can put a whole stack in a slot. Companions eat from their own Provisions slots before anything else in their pack.
- Starvation is easier to notice. A red warning appears across the top of the screen while anyone’s maximum health is being reduced by hunger. The party panel now shows numbers on the health and skein bars, and a starving character’s health shows their normal maximum in brackets.
- The game now shows vigour on the party hover card and in the Journal.
Portraits
There are now four sets of character portraits, chosen in Options → Display: Painted Pixel (the new default), Bold Pixel, Vintage Comic, and the original illustrated Classic set. A few characters only have a Classic portrait so far. Here are some of the characters in each style.


Tsovit’s figure on the map has also been redrawn. He’s now the same height as the people around him.
Lore and names
- Brynja’s first fireside conversation is now a set of questions you can ask her about the stars, the peoples of the Drift and their history, and why you’ve been brought here.
- A new prologue plays before character creation.
- The Journal’s Lore section fills in as you learn things. Entries and additions appear as characters tell you about them or as the story reveals them, and a short note tells you when something has been added or updated.
- Hēahfolc and Numidorian names now follow distinct naming patterns and include a parent’s name: vor (son of) or dus (daughter of) for the Hēahfolc, ur or dis for Numidorians. People use the short form in conversation. Character creation has a field for your parent’s name if you play one of these peoples.
- Brynja has a new portrait.
- Human townsfolk and the Galdorscōl’s people are drawn slightly smaller, to better match the scale of buildings and furniture.
Learning the game
- Options → Guides lists every tour, walkthrough and tip in the game, whether you’ve seen it, and lets you start it again or show it again.
- An interactive controls tour, with separate versions for keyboard and mouse and for a controller. Each step waits for you to try the control before moving on, and shows the actual button you need to press.
- Button pictures appear in tips, hints and item cards, matching the device you’re using.
- New walkthroughs for spending attribute and skill points, for building, and for setting up the settlement. First-time tips cover trading, teachers, tempering, the Wealdend, your settlement, the party panel and sea battles.
- When several actions are possible at the pointer, the name of the selected one is shown beside it.
- HUD buttons show their keys in their tooltips. Hide walls (H) can be rebound. Empty equipment slots say what goes in them.
- Hint bubbles no longer repeat the quest tracker’s objective, and they move out of the way when the hot bar appears.
Quests and errands
- People who give errands now describe where to go in rough terms, such as “a long way to the north-east”, instead of a number of cells. When you accept a new errand while following another quest, you’re asked whether to track the new one. When a tracked quest ends, tracking goes back to what you were following before.
- Optional goals in a quest stay open after the required ones are done, until you move on to the next step.
- A beast you’ve been asked to hunt is placed well away from where you arrive, instead of on top of you. If the errand says the beast is on the road, it is.
- Shrine locations on the world map now have a stone temple in the region, with several floors, a crypt and a sanctum. Anything an errand asks you to fetch from one is in the sanctum’s chest.
- The quest marker can point at an item an errand has placed, whether it’s lying on the ground or in a container. It’s hidden when what it marks is on a storey you can’t currently see, and a marker over a person follows them between storeys.
- The relic is now handed over in the Archmaester’s office at the top of the spire.
Towns and the Galdorscōl
- The Galdorscōl now stands on a hill, with its walled grounds raised above the town and roads leading down to the quay.
- The town beside the Galdorscōl has at least 15 buildings, built on ground levelled for them, and the shops the school’s tasks send you to are always there. Its buildings now get the varied shapes, painted walls, timber framing and roof colours that the villages got earlier this month.

- Townsfolk go to bed at night, and shops close.
- Harbours always face the open sea, and the harbour’s lodging house is chosen by its distance from the quay. In some towns it had ended up on the far side of town, beside a pond jetty.
- The ship is easier to click. Clicking anywhere on the hull, sails or rigging works, and the talk pointer appears when the ship is ready to sail.
- Every room in a house now has a light, with a second one in large rooms.
- When you click where several people are standing close together, the game asks which one you meant.
- Larger homestead households live in two-storey houses with a bed each, and furniture in round houses stands against the walls.
Performance
The Galdorscōl was the slowest place in the game: 63 people, 365 lights and around 19,000 objects. Frame times there have come down from about 30 ms to under 12 ms. Most of that came from updating characters only when something about them changes and from drawing the terrain in chunks so that off-screen parts are skipped.
Rotating the view in the Galdorscōl has gone from about 7 seconds to about 1.3.
Interface and controllers
- Messages now scroll in a panel at the bottom right of the screen. You can choose which kinds of messages appear in the panel.
- An Overlays button under the compass shows the settlement’s borders, zones and pens on the map.
- Options has a switch to show reading text (dialogue, books and cards) in a plain font.
- The hot bar shows the full card for a thraed, mastery or item when you hover over it.
- The hot bar stays usable while your pack is open, so you can drag items onto it on the Steam Deck.
- The party panel collapses to a single button in the same position. The inventory’s party tabs are now small portraits.
- On a controller, the d-pad stays on the confirm buttons when the Journal asks you to confirm a choice. Pressing A on a dialog presses the button under the pointer.
- Choosing a quick attack on the quick wheel no longer uses that slot at the same time.
- The Options screen fits on smaller screens, and the main menu fits taller screens.
- The map no longer zooms or pans behind a conversation.
- Continue is greyed out on the main menu when its save no longer exists.
- In the opening region, hostile creatures are kept further from where you start.
- Hovering the map behind an open panel no longer changes the pointer.
Fixes and smaller changes
- A dungeon’s stairs could be placed so that you arrived on a level boxed in between the stairs and a wall. Stairs are now placed so they never cut off part of the floor, and you always arrive in the open.
- A status effect’s appearance, such as flames from burning, could stay on your character after loading a save. Fixed.
- On misty days, a pale haze covered the screen for the first few seconds and then disappeared abruptly. The haze is now fainter and stays for as long as the mist does, fading in and out with the weather.
- The text at the bottom of thraed and mastery cards no longer runs past the edge of the card.
- Wounds stay where they are on a character instead of sliding around when they walk, jump or change height.
- Shadows sit under characters’ feet in every view, and dropped items and weapons cast proper shadows.
- Cliff fading leaves gentle slopes alone and fades whole tiles instead of parts of them.
- Light on pale floors and walls no longer washes out to white, and lamps now dim gradually towards sunrise instead of switching off at once.
- Candles on shelves and tables can now illuminate the room without their light being blocked by the furniture beneath them.
- You can now choose whether to interact with a light or the furniture beneath it, so a candle no longer prevents you from opening a shelf.
- Fixed furniture sorting problems, such as a table drawing in front of a bookshelf it should be behind.
- Characters in water sink to a depth that suits their size, with their head and shoulders above the surface. Waterfowl float.
- The Skull Altar no longer has gaps in its art when unlit.
- Dark exotic wood is now reddish brown rather than nearly black, making its details easier to see.
- Shaped houses no longer stand on a square slab wider than the house.
- A companion reading a galdorthraed they already know now says so.
- A recruit could be left standing on a dock with dust kicking up under them indefinitely. Fixed.
- The world map’s seagulls fly head first.
- The music no longer changes after world generation or during the opening flyover.
Trying the new build
This is an alpha, and it will have bugs. The voyage, the settlement and the rebalanced combat are the newest parts and the ones most likely to have problems. Saves from earlier builds may not work. If something goes wrong, please report it on the bug tracker or the forum, with a screenshot or your save if you can.